Part 3 - Calculations
This article is part of the Batch job example
After configuring our equipment models we can move on to our calculation tool. This can be found in Calculations > Catalog.
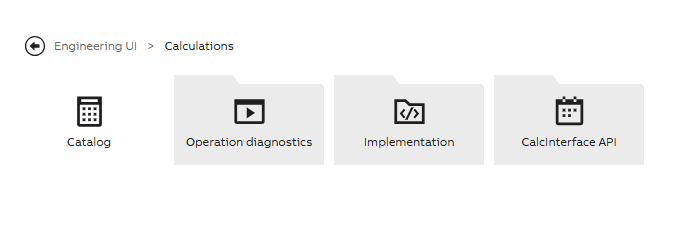
Code adding tool is in Calculations and Catalog menu
In calculation code we use C# as the coding language and the code editor contains a class with a single method. The code reads the existing time-series data and writes the generated data using input and output parameters we have defined.
Cookie Production Line example settings
For demo purposes we have created the property values ourselves and did two calculations to create a working batch job monitoring system (one simulator calculation and one batch job calculation).
Calculation definitions
Settings needed to configure for a working calculation:
- Calculation name
- Trigger (defines how and when calculation should run)
- Calculation period (if there is no need to define this separately, this can be same as scheduler trigger)
- Data Mappings (define output and/or input parameters)
- Code
First calculation - defining values
In our first calculation we define current values to our properties as discussed in part 1. For unique material id numbers, we use a simple random number selector. Example below.
Random rndIdMaterial = new Random();
int materialIdNumber = rndIdMaterial.Next(1000,4999);

CCLine.Mixer.Butter.Amount.CurrentValue = 11.4;
CCLine.Mixer.Butter.Price.CurrentValue = 22.2;
CCLine.Mixer.Butter.MaterialId.CurrentValue = "BV" + materialIdNumber;
The CCLine in the beginning refers to our parameter mapping naming that gives us access to our model instances and properties within. You may choose a name that is most convenient, but keep in mind that this may not include the equipment model name.
Trigger
We have defined that the overall production time is 36 minutes and property values will be updated in different minutes within that time frame. For this calculation we have defined 1 minute scheduler trigger and the simulator logic is in the code we have created.
Mapping
For data mapping we defined our Production Line 1 as the output parameter. This way our calculation iterates through all our instances and properties within. Remember to include Path_ name when defining Class Name, and Name=' ' when referring to all properties and instances of the equipment model. Example shown below.

Example of Class Name and Where String
Running calculation
After defining all calculation settings and finished with the code, we may close the calculation and turn it on to see that it starts running as set (a green check mark should appear on the right corner of the calculation or process).
Running calculation shows green sign
Second calculation - batch job
After defining values and monitoring system logic in our first calculation, the second calculation is created for tracking our production batches. This is done by making the calculation run in batch mode.
Trigger
For this calculation we defined event based trigger and chose cookie batch id as the triggering event. This means that when the cookie batch id changes, the calculation activates, iterates the code once and writes values to defined properties. Now our batch calculation runs only once per production batch.
Enable batch job
In addition, we enabled batch job on the calculation settings and we chose cookie batch id as as the batch indicator. With this setting the calculation starts working in batch mode and separates production batches every time the cookie batch id changes. See our example below. When setting the batch indicator, Class Name and Where String values are written in the same way as for data mapping (including Path_ and Name='').
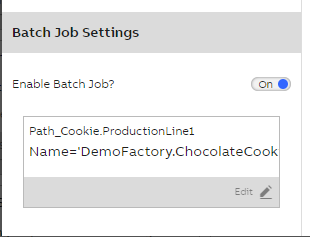
Batch job enabled on calculation settings
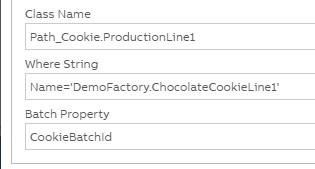
Batch indicator definitions for equipment property
Code
In our batch code we define sum and average values of our production batch. Total raw material values for each batch are updated to pricetotal and amounttotal columns. Besides these, average temperatures of mixer and packager will be monitored during each batch and updated accordingly (averagepackagertemperature for packager and averagetemperature for mixer ).
In our example total and average values are gathered as shown below in the code example. .Sum gathers property data from the last ended calculation period (which in our case is the production time of one batch) and updates the summary to given property value. The .Avg calculates the average of the temperature fluctuations.
CCBatchLine.Mixer.Sugar.AmountTotal.CurrentValue = CCBatchLine.Mixer.Sugar.Amount.Sum;
CCBatchLine.Mixer.AverageTemperature.CurrentValue = CCBatchLine.Mixer.Temperature.Avg;
The CCBatchLine. in the beginning refers to the output property name given when setting output parameter. You may choose a name that is most convenient, but keep in mind that this may not include the equipment model name.
VtrinLib method for writing to Equipment Event class
In our example we are writing some of our property values to existing Equipment Event class as this table allows more rows than a regular Equipment Model class does. For our daily production report we are creating a log type datalist and as this will have quite many rows with daily key figures we are using the Equipment Event as source in this.
In our batch calculation we first create the needed properties and this we actually need to do on our desktop application Vtrin, which can be opened with Command Prompt. When logged in to Vtrin we search for Language Strings display. On that display we open edit mode and create these properties as "Event Attribute Types" Enums and then assign our property values to these. Please see example of Vtrin settings below.

Event Attribute Types of our example
In the code we use VtrinLib method to access the Equipment Event class as shown below.
DateTime batchStart = CCBatchLine.ProductionStart.CurrentValue.Value;
string newBatch = BTtest.CookieBatchId.Last.Value;
DateTime batchEnd = BTtest.ProductionEnd.CurrentValue.Value;

var newEvent = this.Driver.Classes["EquipmentEvent"].Instances.Add();
newEvent["BatchPeriodStart"] = batchStart;
newEvent["CookieBatchId"] = newBatch;
newEvent["BatchPeriodEnd"] = batchEnd;
newEvent.CommitChanges();
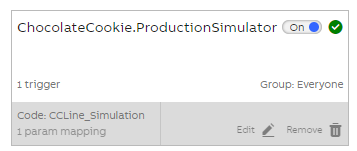
Running calculation
After commiting code and saving changes the calculation will start working in batch mode and is triggered every time the cookie batch id changes: Every time the value of cookie batch id changes the calculation will know that a new batch production has started and separates batches based on the id number.
Now, when we next look at the user interface monitors, we are able to track and monitor changes in production properties. If needed, we can select a certain cookie batch and check for example the material ids, amounts, prices and machine temperatures. This allows us to also detect possible malfunctions or efficiency in our production line (e.g. wrong material amounts, too low or too high temperatures).
We will look into these in the last part User interface.
More information on calculation tool?See calculation tool documentation: Concepts
Using calculation tool in Engineering UI: Calculation tutorial
Updated 4 months ago
Lastly we will have a look at how to implement user interface to application