Configure NLS translations for custom widget property name
This tutorial explains how a user can configure NLS for a custom widget property name
- Create a custom widget with a Widget Property as 'Widget Height' as shown in the below code.
private WidgetHeight: IProperty<string> = this.Properties.Add(
		"Widget Height", cPropertyType.Text, {
		Category: "General",
		Description: "Enter the widget height",
		IsBrowsable: true,
		IsSerializable: true,
		DefaultValue: "100"
	}
	);

	private WidgetWidth: IProperty<string> = this.Properties.Add(
		"Widget Width", cPropertyType.Text, {
		Category: "General",
		Description: "Enter the widget width",
		IsBrowsable: true,
		IsSerializable: true,
		DefaultValue: "200"
	}
);- Check if the widget's .mdw.json file is in the below format.
{
	"Name": "nls-example-ts",
	"Category": "NLS Example Widgets",
	"Class": "MyWidgets.NlsExampleTs",
	"Sources": [
		"$/nls-example-ts.js"
	]
}-
Open Engineering UI and navigate to UI Strings data list, create new items in the data list with the target translations as shown in the below screenshot. Provide the Section as 'MyWidgets' which is part of the widget class and Key as 'NlsExampleTs#' and followed by Text and Tool Tip text for the target language translations.

-
Launch View with desired language of choice (here I selected 'Telugu' because I already have translations for the widget properties mentioned in step 1), and create a new Dashboard in view and add the custom widget created.
-
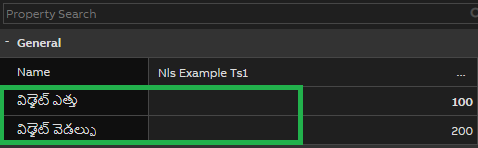
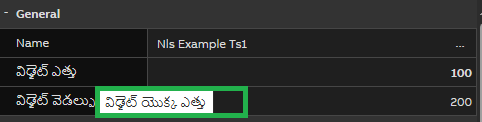
Check widget properties name in General category by selecting the desired language and the widget property 'Widget Height' and 'Widget Width' should be translated as shown in the below screenshot, and also Tool Tip text will be used for the Property Description as shown in the below screenshots.
Updated 8 months ago