Installing DCN (Data Collector Node) of a Hierarchical System
This article will guide you on how to install a data collector node (DCN) of a hierarchical system on a Windows environment.
What is Hierarchical System?
Majority of manufacturing operations management are typically constructed from layered architecture where the data collector nodes (DCN) are connected to field devices, control systems and other data sources. Nodes can form hierarchies such as production line and factory level and they can then further be connected to upper level computing node, e.g. enterprise level. Typically, lower level nodes transfer data to upper levels as raw or aggregated format. Data collector nodes as well as upper level nodes may contain applications such as calculations and visualization. Applications may produce data that may also be transferred in both directions in the hierarchy and sometimes also written down to control system or device. For further details of hierarchical system refer to this Link.
NoteThese hierarchical systems mainly use variable based data collection concept of ABB Ability™ History to push the collected data to upper level and does not readily support its equipment based data collection feature to push the collected data to upper level
Checklist to be verified before start of installation
- Recommended Hardware Configuration is available. [Preferred to have dedicated drives for Database and Backup.]
- Dedicated Network adapters are available.
- Database Disk Drive should be formatted with 64K Block Size.
- Indexing should be disabled for the Database Drives.
- Add database and backup directories as exclusions to the possible AntiVirus software
- Open firewall for incoming TCP/IP port 443
- Installation should be performed with the user having Administrative privileges.
Install Data Collector Node
Download PackageDownload the latest History software from ABB Ability™ History Downloads and copy to your local drive and extract its content to a separate folder (e.g. C:\DVD).
The software download is available only from ABB intranet.Installation through Network share is not supported.
Refer:
Installation on Windows
Installation parameters
Add User to Windows Vault
Add user and its credentials for CPIMS/ADMIN, CPIMS/DBADMIN and CPIMS/MAINDBADMIN to windows vault so that the same can be referred in the installation command in order to avoid passing the clear-text password.
NoteMake sure that the users you are adding to the vault is part of local admin group and proceed with installation by log in to the system with the user you are passing for CPIMS/ADMIN
For easy understanding, in below commands the same user 'testadmin' is considered for both CPIMS/ADMIN and CPIMS/DBADMIN, but in production there can be different users for 'CPIMS/ADMIN' & 'CPIMS/DBADMIN' and the below command can be replaced with corresponding users. The user 'testadmin' is considered for CPIMS/MAINDBADMIN these can be replaced with your corresponding dbadmin user which is created in the Main Server system.
cmdkey /generic:CPIMS/ADMIN /user:testdcnadmin /passEnter the password for 'testdcnadmin'
cmdkey /generic:CPIMS/DBADMIN /user:testdcnadmin /passEnter the password for 'testdcnadmin'
cmdkey /generic:CPIMS/MAIN_DBADMIN /user:testadmin /passEnter the password for 'testadmin'
Domain UserIn case the user is part of a domain, make sure to add the user to local admin group and pass <domainname\username> in above mentioned command
e.g. cmdkey /generic:CPIMS/ADMIN /user:MyDomain\testdcnadmin /pass
Install Command
In an elevated command window navigate to the folder where the media is extracted ((e.g. cd C:\DVD) and run the below command after altering the parameters within "<>" or you can copy the command from example which is covered in below section.
*cmd /s /c ""Project CPIMS\Install_Server.bat" /MAINSERVERNAME "<HA NLBName or SA Machine name>" /MAINSERVERIP "<HA NLBIP or IP of SA>" /MAIN_DBADMINUSER "*CPIMS/MAIN_DBADMIN" /MAIN_DBADMINPASSWORD "*" /NODETYPE 0 /INSTALLATIONTYPE 1 /DBSIZE "LOW" /DATAPATH "<DataBaseDriveLetter>:\RTDBData" /APP_ROOT "<DataBaseDriveLetter>:\Application" /TZ "<MyTimeZone>" /DSN "<ComputerName>-RTDB" /BACKUP_ROOT "<BackupDriveLetter>:\" /NOBACKUP:0 /ADMINUSER "*CPIMS/ADMIN" /DBADMINUSER "*CPIMS/DBADMIN" /ADMINPASSWORD "*" /DBADMINPASSWORD "*" *where
- DataBaseDriveLetter - The drive which is decided for data for e.g. "D"
- BackupDriveLetter - The drive which is decided for Backup for e.g. "E"
- MyTimeZone - The time zone in which the system is running e.g."Asia/Kolkata" (note: This parameter must match with the regional setting of the computer)
- ComputerName - Pass the actual computer name "Project CPIMS" style DSN
- HA NLBName - High Availability Machine Network Load Balancer Name provided when configuring NLB in high availability server (used in case of high availability history servers, can get this name by passing nlbmgr in a command line window of the HA system)
- HA NLBIP - High Availability Machine Network Load Balancer IP provided when configuring NLB in high availability server (used in case of high availability history servers)
- SA Machine name - Standalone Main server name (used in case of standalone history server)
Example DCN Installation command
Here is an example install command of a DCN which will connect to a High Availability History server, considering 'D:' as database driver and 'E:' as Backup drive and 'Asia/Kolkata' as the time zone.
All the available installation parameters are listed in the chapter "Installation parameters
".
cmd /s /c ""Project CPIMS\Install_Server.bat" /MAINSERVERNAME "MyNLB" /MAINSERVERIP "xxx.xxx.xxx.xxx" /MAIN_DBADMINUSER "*CPIMS/MAIN_DBADMIN" /MAIN_DBADMINPASSWORD "*" /NODETYPE 0 /INSTALLATIONTYPE 1 /DBSIZE "HIGH" /DATAPATH "D:\RTDBData" /APP_ROOT "D:\Application" /TZ "Asia/Kolkata" /DSN "%ComputerName%-RTDB" /BACKUP_ROOT "E:\" /NOBACKUP:0 /ADMINUSER "*CPIMS/ADMIN" /DBADMINUSER "*CPIMS/DBADMIN" /ADMINPASSWORD "*" /DBADMINPASSWORD "*""This process will verify the time and ask for the user confirmation, you can acknowledge and proceed if the time zone and time is correct. Go through all the prompt from Installation command window and provide acknowledgement accordingly.
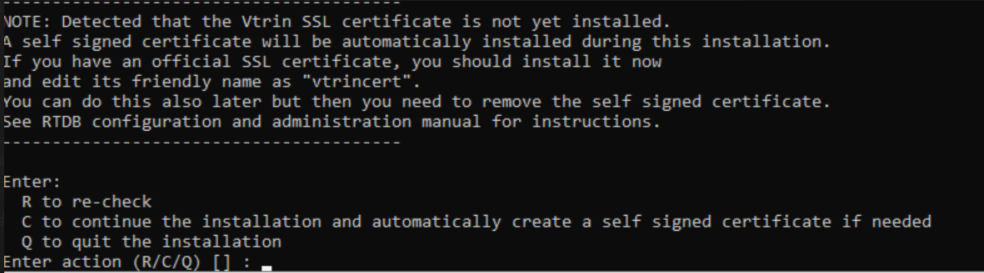
If the Vtrin SSL certificate is not present already (which is true in this case), there will be a prompt as shown in below image. You can proceed by providing 'C' in the option to continue the installation by installing the Self signed certificate. If there is already a SSL certificate available from the customer you need to install the certificate and edit the Friendly Name of the certificate as VtrinCert and provide option 'R' so that the installer scans the certificate store again.
There are some cases where during the installation process the system requires restart. The install script will try to postpone it to the end of installation, if the reboot is mandatory then the install script records that in console output as well as the install logfile and exits the process. Based on the logged output, the user has to initiate the reboot OR reboot and rerun the same command again in order to complete the installation.
Installation Log
The installation progress is displayed in console and also its stored in a logfile APP_Install_RTDB_Project_YYYY-MM-DD.log in the path "%userprofile%\ABB Oy\Log". It is advised that the user goes through this log file for error codes before starting RTDB. The installation reports the success/failure with the process exit status.
- '0' means success
- 3010 means that the installation was successful but a reboot is still needed
Any other code apart from the above mentioned, then there is a failure.
DCN registering itself to Main History Server
Once installation is completed and the system is restarted, RTDB will run some post install scripts in order to register itself to the main server node. This can be verified by checking whether the Main history server entries (1 entry in case of Stand Alone History server, 3 entries in case of High availability History server) are created in database nodes list with its 'Type' as 'Main'.

fig (1) - Database node in DCN
NoteThe main server will push all the existing entry in its Database nodes list to DCN so there may be additional entry other than Main server entry in database nodes in case if there are other DCNs present in the setup and are already communicating to Main server.
Updated 8 months ago