Part 8 - Using Engineering UI
This article is a part of "Creating an Equipment model" tutorial
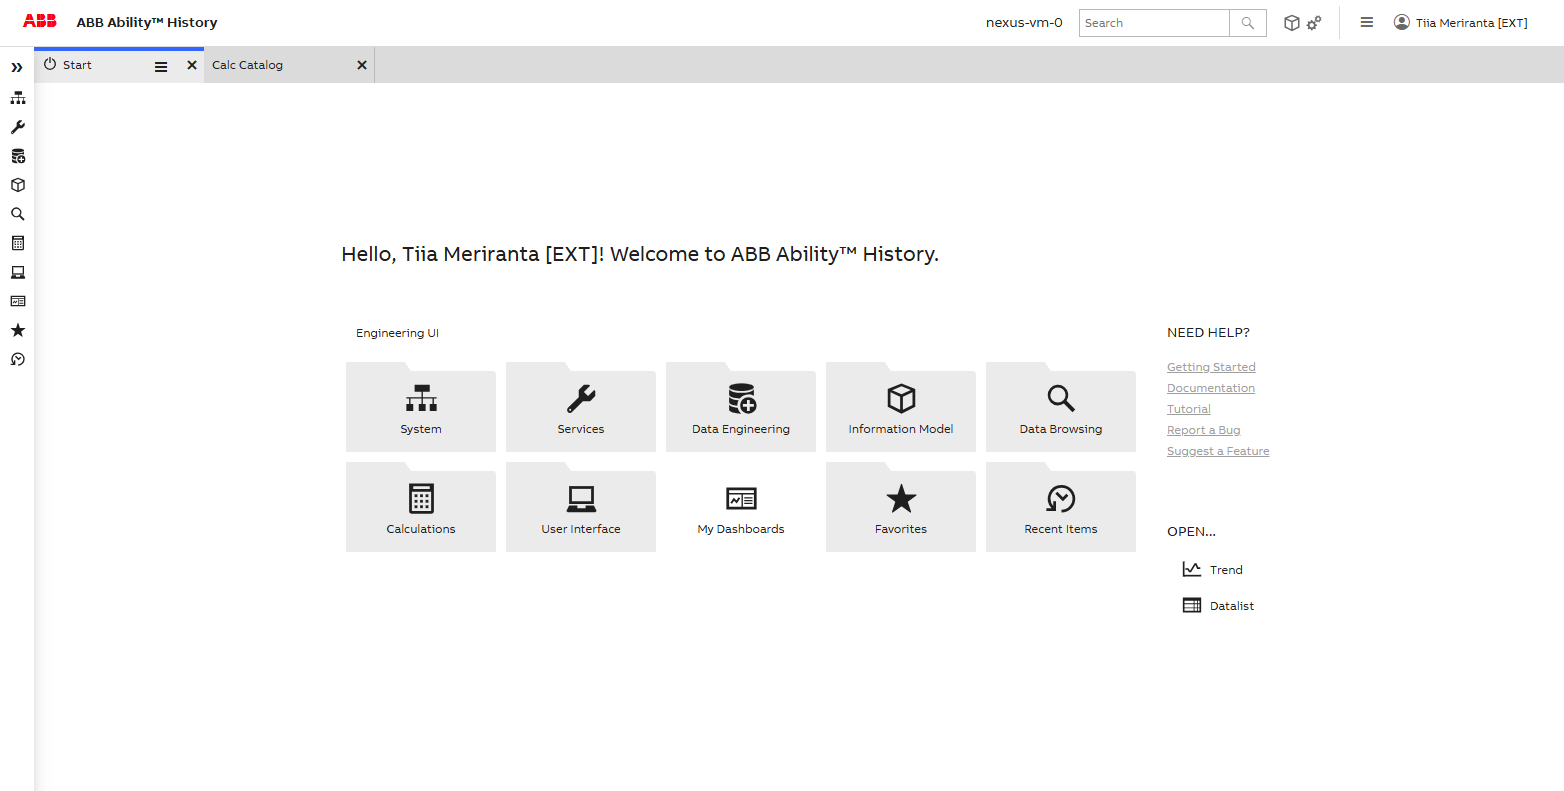
Engineering UI is a web application that can be used to manage ABB Ability™ History. Our Engineering UI may be used to easily maintain the configurations, monitor the performance and audit the use of the History.
The Engineering UI can be accessed using a modern web browser (Chrome, Firefox, or Edge) and navigating to https://<server-address>/history with your web browser.
Locally on the server, the Engineering UI can be accessed using a shortcut "ABB Ability™ History - Engineering UI" on the desktop or navigating to https://localhost/history.
Background
Before the Engineering UI, most of the administrative operations of ABB Ability™ History were done via a desktop application called Vtrin. Vtrin is a powerful application, but it has not been actively developed since 2007.
Main features of our Engineering UI may be found under Administration > Engineering UI.
Creating an Equipment Model
Engineering UI may be used to create Equipment Models and calculations, among other things. Next we will show you the simple steps of creating a monitoring system using Engineering UI.
Classes and properties
After defining our model hierarchy, classes and properties we may configure these in Engineering UI.
In main menu we choose Information Model > Equipment Classes.
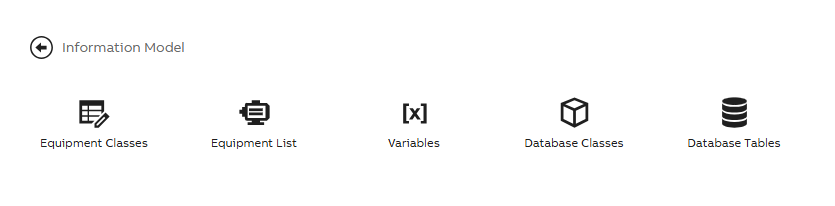
Information Model menu displays
This is where we can create and modify our equipment model, properties and parameters. Existing classes are visible on the left side and when you choose one from the list, the properties of that class open on the datalist on the right side.
On the left side datalist you may create new equipment models by choosing Edit and New from the bottom of the list. Provide name, possible base and other options as needed and press Commit to save changes. After creating a new model, you may then start creating properties to the right side property list. You may do this with the Edit and New buttons.
Few notes to consider when configuring properties:
- Reference properties: When creating reference properties of type GUID, equipment model of those properties need to be defined in
reference targetcolumn. In our example the reference target for Tank could be for example Class:Path_Tank. - For target history settings may differ depending on property type. CurrentHistory is optimized for frequently updated history values. StreamHistory is optimized for write once and read frequently type of use. Find further explanations under Time Series Concepts > History Tables.
- Choosing Data types: Choose data type carefully to avoid changing it later. Changing types during process may create errors in the system that prevents property definitions in the code.
- Compression Method: If equipment properties are being used in calculations, it is strongly advised to use No compression. Further information: Calculations > Concepts.
- Discrete value: This is an advanced setting found in Properties menu on Equipment Classes window (click one property active, open property attribute menu from wheels in top right corner and press + sign. Discrete Value should show under General settings). When calculated value presents a time period, such as 30 minutes, Equipment property should be defined as discrete and not linear. Some values differ from this of course, such as temperature or power. Please see further information: Calculations > Concepts.
Configuring property attributes: More information here.
Equipment Instances
Next is to create instance(s) for the model(s) created. From the main menu choose Information Model > Equipment List This will open similar looking view where list of Equipment Classes are on the left side and instances on the right side. Creating and modifying works similarly as with properties. Remember to commit changes to save them.
Creating instances correctly requires at least the following information:
- Name (e.g. Pump)
- Parent (e.g. Example site.Pump section)
- Process Path (e.g. Example site.Pump section.Pump)
- Equipment model (e.g. Electrical device )
Please note that if you have GUID properties, write their process path on the property value cell as well (For example For GUID property Source Tank the path would be site.Tank area.Source Tank). In latest versions, system shows path options in dropdown menu automatically.
Overriding property attributes
In Engineering UI it is also possible to override the default property attributes on an instance level. Please see quick user guide under Equipment property info attribute override in Engineering UI.
Further information on Equipment Model?Please see our equipment model concept article.
Creating Calculation
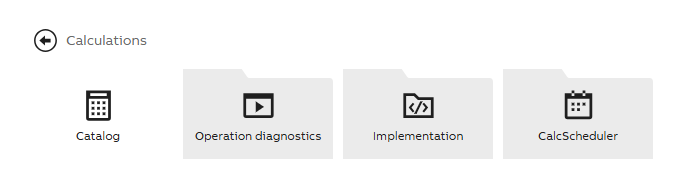
From Engineering UI main menu we choose Calculations > Catalog.
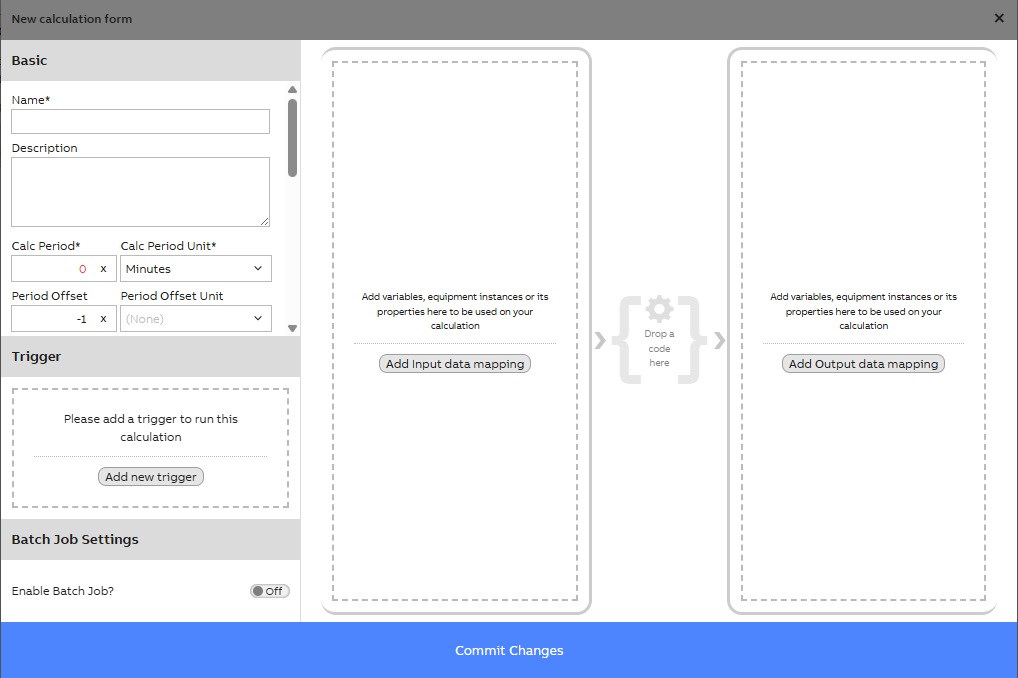
New calculation form
New calculation may be added from Add Calculation button that will open a pop-up window with code configuration settings.
New calculation settings
Calculation settings
Name and description
Name of the calculation is recommended to be simple yet describing. Description will give further information and purpose for calculation. Calculation name may not include equipment model name or the system will show error when creating the code.
Group
Group selection gives the possibility to specify who is able to see and modify the calculation we are creating. Dropdown menu shows the possible options based on user access rights.
Calculation Period
Please note that with latest updates, the Calc Period and Calc Period Unit are compulsory settings. If the calculation period does not need to be defined separately, it can be set the same as scheduler trigger (e.g., 1 min).
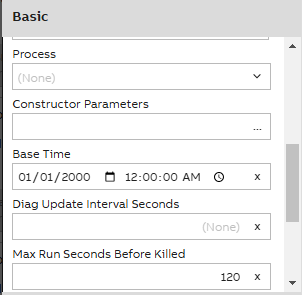
Further settings
The calculation basic settings have a list of other optional or advanced settings if needed. These include for example calculation offset, calculation base time, Constructor Parameters, Enabled Timeframe Start.
When the calculation is running, process logs may be opened by right clicking the calculation on the calculation catalog main page and from pop-up window choosing the "process logs".
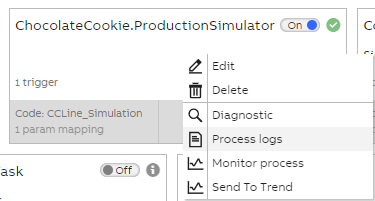
Menu that opens when right clicking a calculation.
Picture above shows menu that opens from right clicking a calculation. Diagnostic shows last execution time, Process logs show e.g. WriteLine information and process start & end time. Monitor Process show CPU and Memory usage. Send To Trend shows Equipment Model properties and calculation process in chart view. Please note that trend will only show numerical and historized properties.
Trigger
Trigger will tell the system how the calculation should be triggered. We can choose from three options:
- Scheduler: The calculation will run periodically with a given schedule. For example 1 hour scheduler means that the calculation will run once every hour.
- Event: Calculation will run after a given event has occurred. In our cookie production line example a calculation could be triggered every time the batch id changes. If event does not happen, calculation will not run and the event trigger will this way define the calculation period as well (even or uneven).
- Task: Calculation will run only after another calculation task.
Code & Data Mapping
Data Mapping
Data mapping means choosing input and/or output parameters for the code. Please be advised however that after the code has been added, the parameters may only be changed in input/output mapping by replacing the already added. If user wishes to add or remove parameters, that need to be done on the code window.
Parameters may be an equipment model, a single property or a single instance. Below we will show and example when using all instances of an equipment model.
To consider when defining data mapping:
- Name: Name should be recognizable yet not include equipment model or calculation name. These will give you errors when defining code.
- Type: From dropdown menu we can choose the Equipment model we want to use.
- Class Name: This should include the path for the equipment class. For example Path_Device.
- Where String: We can leave this empty, if we want the code to iterate through all our instances in the Equipment model (see "implicit for each" setting below). When referring to all instances we could include Name= ' ' here. This would allow us to specify an Instance. This is used in case of Variable parameters as well. Please see the user guide to know more about Operators used in Where String.
- Select Property: If we only use a single property in calculation, that may be defined here.
- Implicit for each: Choose this, if you want the code to iterate through each instance of the Equipment model.
Please see the configuration example below for the Pipe Equipment Model.

Data Mapping Configuration
Please note that you may also create code first and then add parameters in the code editor window. We will show and example below.
Add code
The calculation code contains the actual logic and we use C# as the coding language. The calculation code is a class including a single method. The code reads the existing time-series and writes the generated time-series using input and output parameters.
Code editor will open another pop-up window where name, description and code may be defined. Code name has to be different from calculation name or system will give error message. If you have entered parameters before adding code, the chosen parameters will be ready when opening the code editor. Otherwise you may Add parameters in this editor as well. Please find example of adding a parameter below. Remember to Commit code before closing to save changes. We strongly advise first to add parameters and then the code.
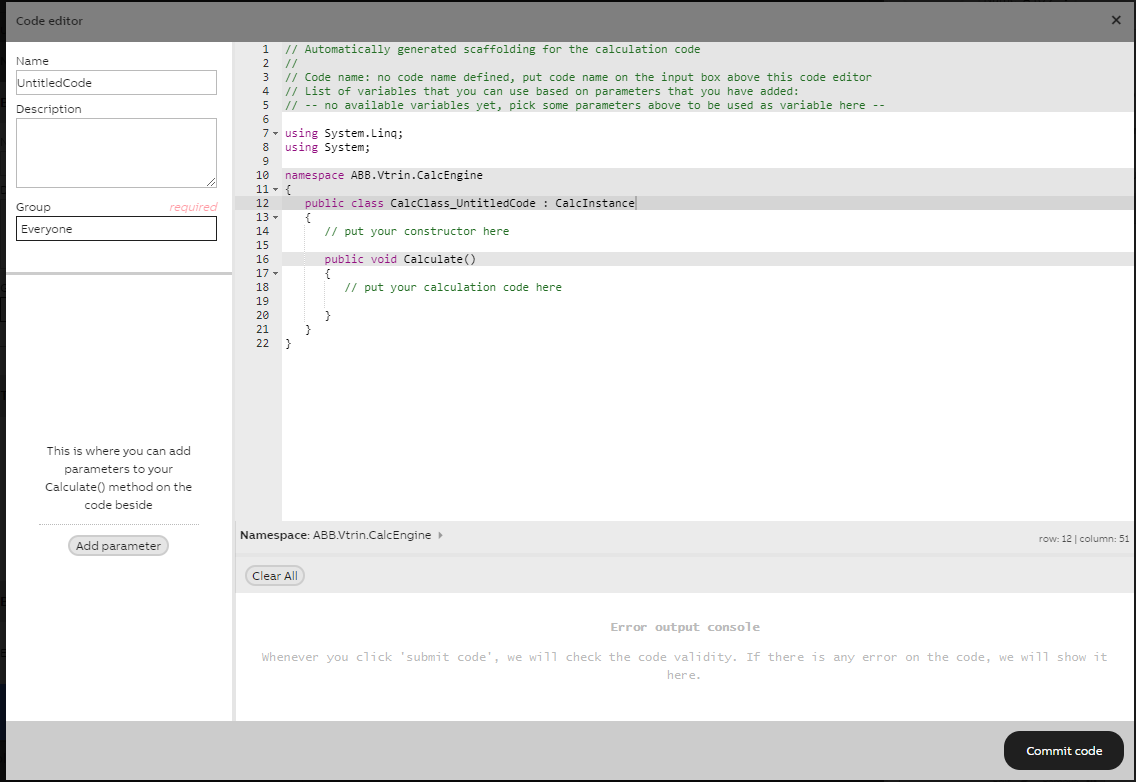
Code editor window
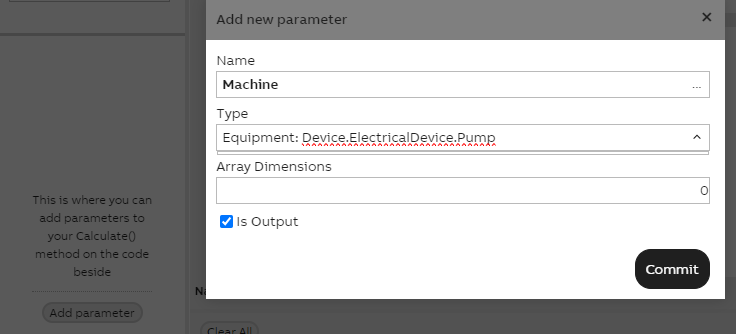
Example of adding parameters in code editor window
After applying the code and other settings, the calculation pop-up window may be closed and calculation should start running when turned on.
Further information on Calculation tool?We have prepared a separate calculation tool tutorials with configuration setting guides for variable, equipment instance and equipment model use. Please see calculation tool tutorial.
Updated 3 months ago