Catalog
This display allows you to create new calculations and browse through existing ones. If no calculations are yet created, the display is empty. User groups may be defined to single calculations, so for each user the calculations showing on display, may vary.
New Calculation
Add Calculation button opens an empty calculation where calculation settings may be configured.
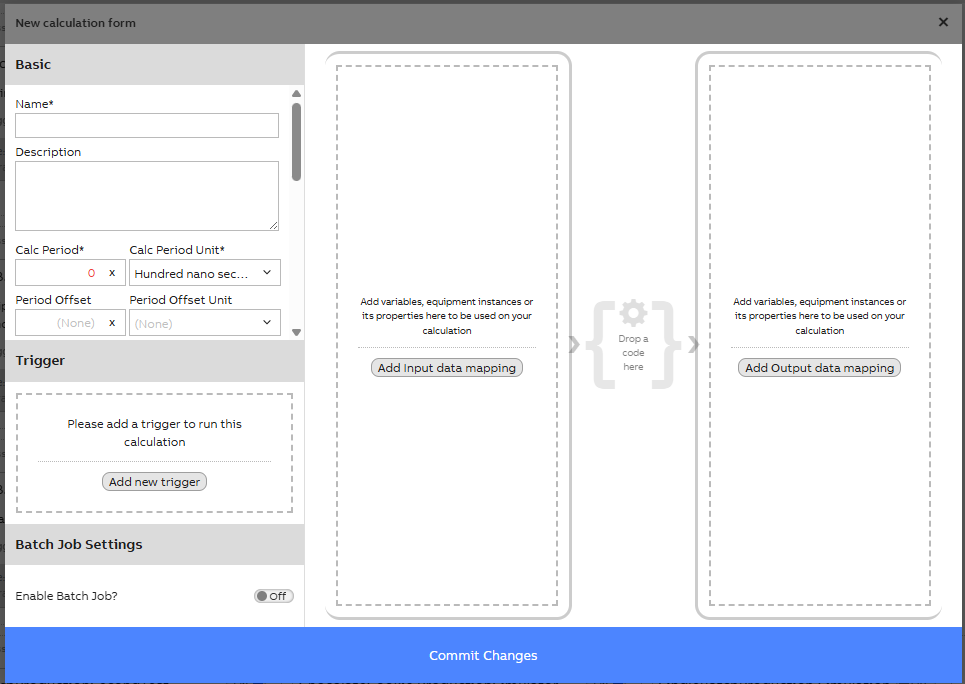
Basic settings
| Calculation setting | Description |
|---|---|
| Name | Name of the calculation shown in the Catalog display. May not include Equipment Model name (system will give error in code). |
| Description | Description will give further information and purpose for calculation. |
| Group | Group selection gives the possibility to specify who is able to see and modify the calculation. These are based on user groups defined for system. Dropdown menu shows the possible options based on user access rights. |
| Calculation Period | Defines calculation period from which e.g., average and sum values are calculated. Provides dynamic calculation period with batch indicator where calculation period is defined by e.g., a factory event. If the calculation period does not need to be defined separately, it may be set the same as scheduler trigger (e.g., 1 min). |
| Period Offset | Delays the invocation of calculation code, if used. |
| Process | Shows the process name for the calculation task. CalcProcess is a process that executes the calculation code. Multiple calculations can be in one calculation process. Includes also calculation name. |
| Constructor Parameters | Optional constructor parameters for the definition code constructor. |
| Base Time | Sets the alignment of calculation periods. |
| Diag Update Interval Seconds | Represents how often the CalcTaskDiagnostics row for this task should be updated. Setting this to a low value for many CalcTasks can have negative effects on system performance. |
| Max Run Seconds Before Killed | The maximum time of seconds this task is allowed to execute for. 0 is unlimited. |
| Enabled Timeframe Start | The calculation task is only enabled for calculation periods after this time (inclusive). |
| Enabled Timeframe End | The calculation task is only enabled for calculation periods before this time(exclusive). |
Trigger Settings
To run the calculation, a trigger need to be added. Add Trigger opens a new pop-up window with three possibilities listed below:
| Trigger | Description |
|---|---|
| Scheduler | Run periodically with a given schedule. E.g. 1 min scheduler means that the calculation iterates through code once per minute and updates values accordingly. |
| Event | Triggered when CurrentValue changes on a given instance property. This can be especially useful in batch type calculations, where e.g., batch ID may be the triggering property and this way also marking the start and end time of a batch. |
| Task | Executed after another calculation task. Allows to choose an already existing calculation as the task. |
Data Mapping
Data mapping means choosing input and/or output parameters for the code. Parameters may be an equipment model, a single instance or a property of a model. We an also create calculations for single variables.
Please note however, that after code has been added to the calculation, the parameters may only be changed in input/output mapping by replacing the already added. If user wishes to add or remove already added parameters, that needs to be done on the code window (and after making sure mappings are correct).
Parameters may simply be dragged and dropped on the dotted line areas and then further defined from Edit. Drag & drop may be done from the open menu on the right side. Variables and Equipment models are listed separately.
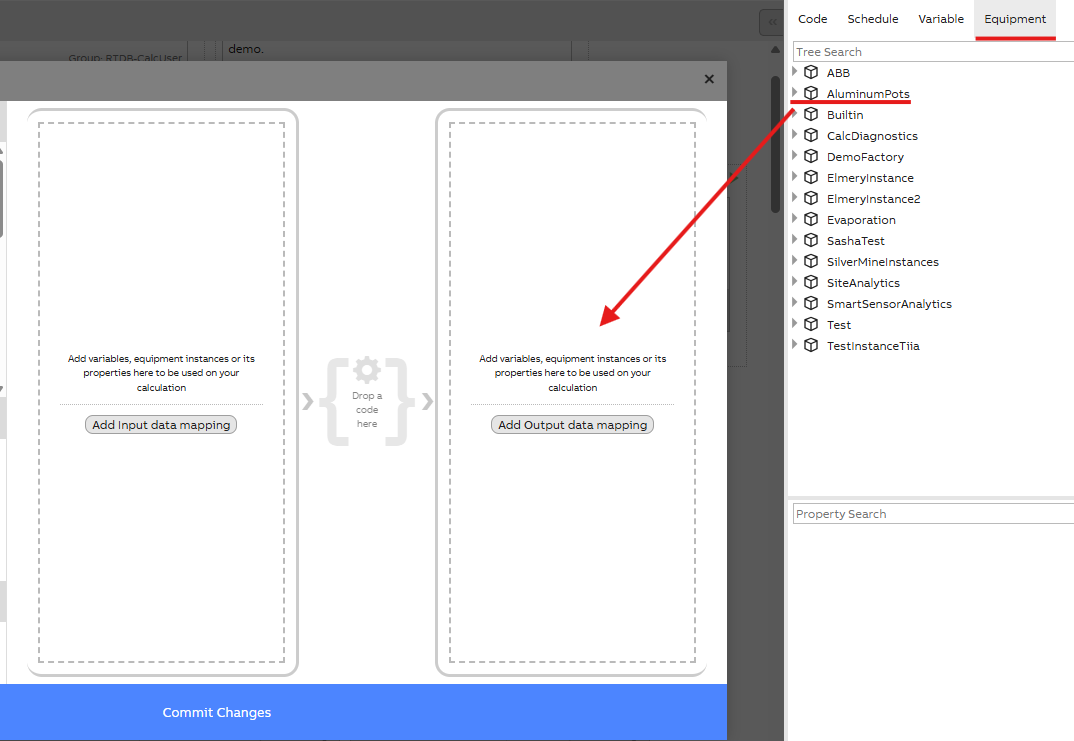
Example of data mapping menu. User may choose model instance from list and drop on top of dotted line area.
Mapped data may be modified from edit icon. This opens a small data mapping pop-up window as shown below.
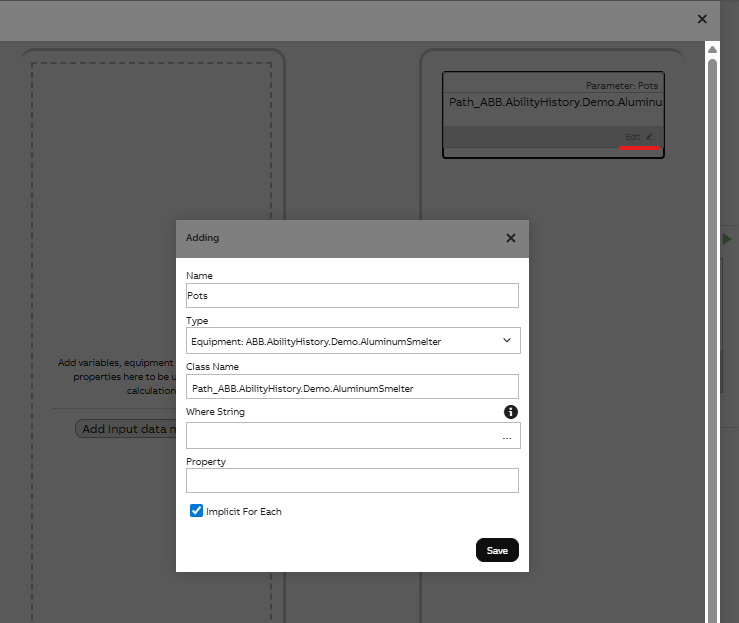
In this example we want to access all our model instances, so we have simply defined our model Type and Class Name and then chosen the Implicit for each. This way our calculation iterates through all our model instances and allows simpler code.
If we have multiple instances in our model, but would want to use only one in our calculation, we could add the instance path to the Where String box with Name='' definition. Example shown below.
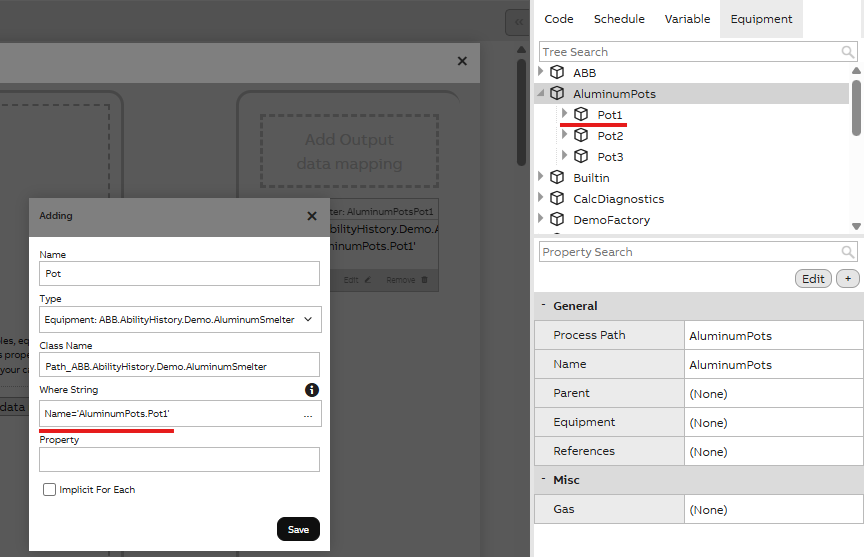
Remember to save changes.
Please see further instructions for mapping data here.
Code
Opening code editor is done simply on the Drop a code here shown in the middle of input & output data mapping settings. You may choose an existing code (if code was created first or another existing code id needed for new calculation) or add a new one. Remember to save settings after editing before closing the code windows.
The calculation code contains the actual logic and we use C# as the coding language. The code editor shows a single method. It reads the existing time-series and writes the generated time-series using input and output parameters.
Code name has to be different from calculation name or system will give error message. If you have entered parameters before adding code, the chosen parameters will be ready when opening the code editor. Otherwise you may Add parameters in this editor as well. Please find example of adding a parameter below. Remember to Commit code before closing to save changes. We strongly advise first to add parameters and then the code.
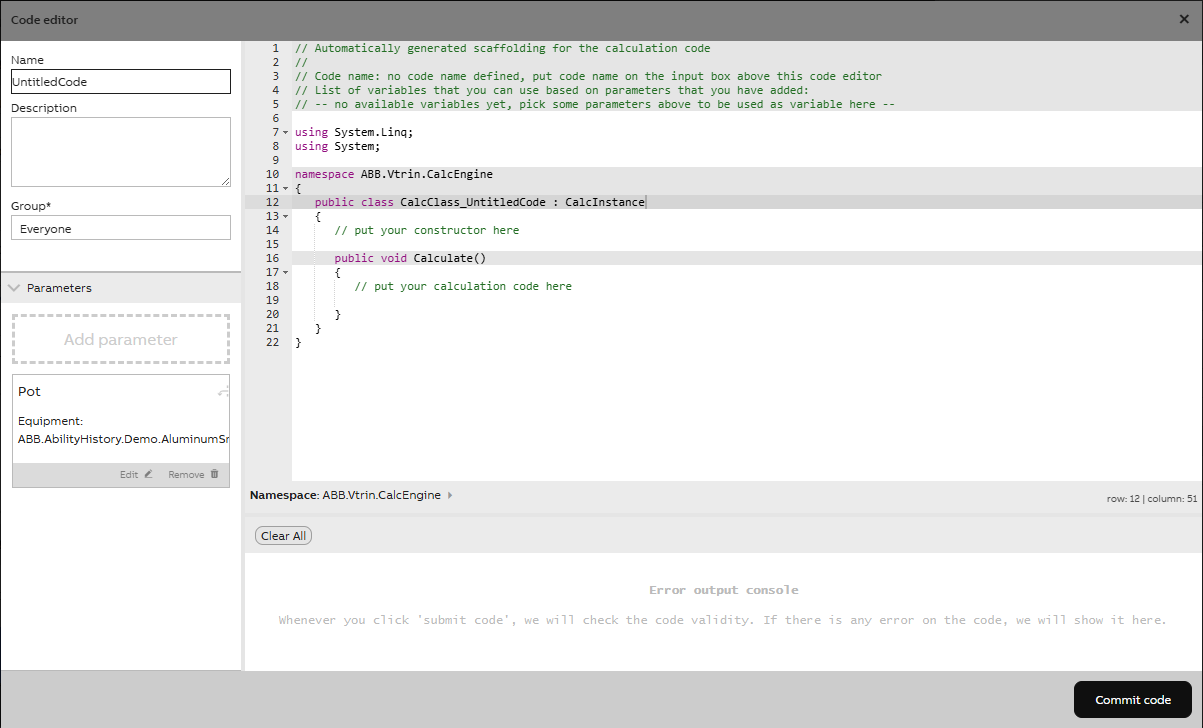
Code editor window with mapped parameters
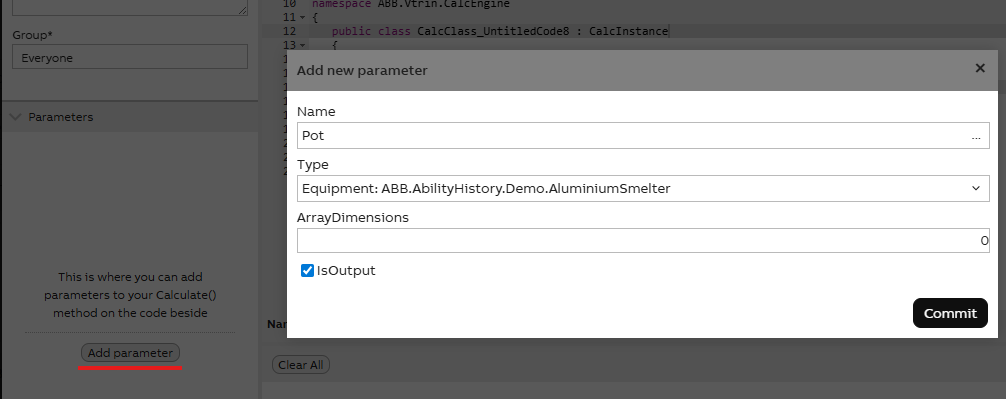
Example of adding parameters in code editor window
After applying the code and other settings, changes may be committed and calculation editor window closed. Calculation should start running when turned on and green play icon is showing on the top right corner.
Calculation error
If exclamation mark appears on top of the calculation, it means calculation settings or code has some errors. Clicking the exclamation mark opens the error message.
When calculations are done for the first time, some further permissions might need to be set. These will appear as errors as well, but may easily be fixed by following the instructions on the screen.
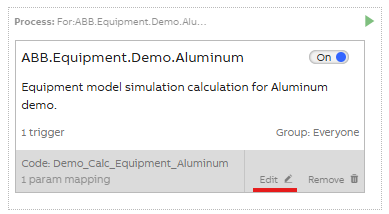
Modifying existing calculations
Opening and editing existing calculations may simply be done from edit. Remember to commit changes before closing calculation window.
Modifying data mapping: Please note that if data parameters need to be added or deleted after code has been added to calculation, this may be done only on the code editor window.
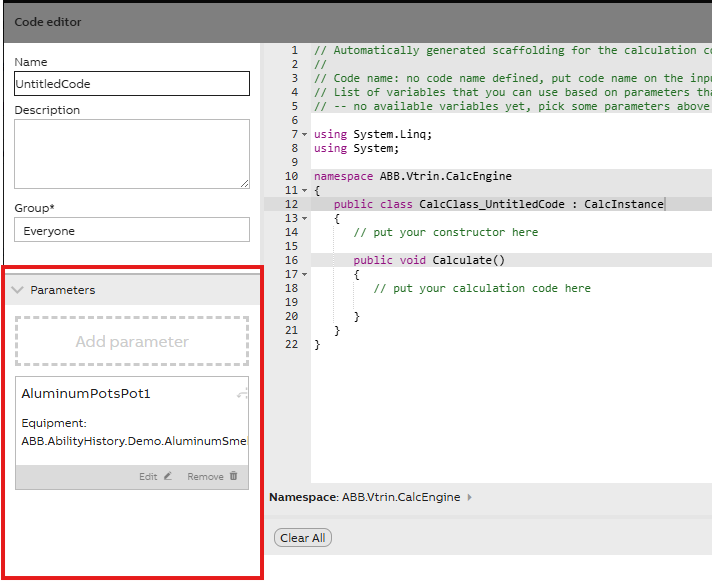
Parameters may be added or deleted on the code editor window.
Recalculation
Found in menu by right clicking on top of a calculation.
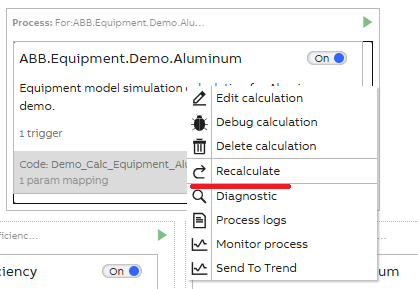
Recalculate lets you choose start and end time. Values in this specified period will then be recalculated and rewritten in the database. We advise to use this option with caution.
Monitoring calculations
Calculation
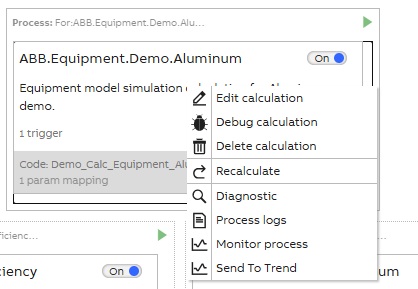
Menu that opens when right clicking a calculation.
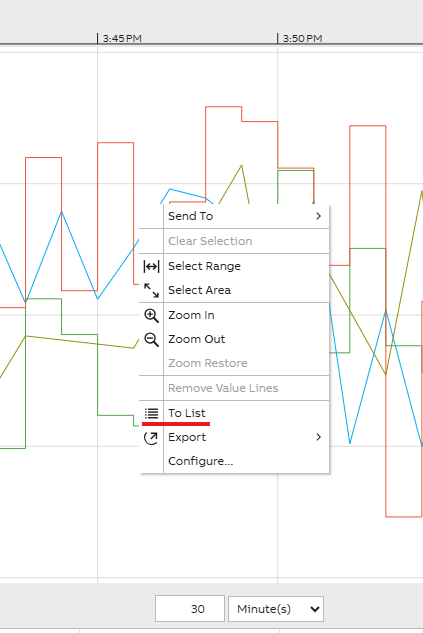
Picture above shows menu that opens from right clicking a calculation. Diagnostic shows last execution time, Process logs show e.g. WriteLine information, process start & end time, and possible errors, if these appear. Send To Trend shows Equipment Model properties and calculation process in chart view. Please note that trend will only show numerical properties. Chart may be opened in List form as well by right clicking on top of the trend. List view shows also string values.
Process
Each calculation has its own process (and multiple calculations can be under one process, if they have the same Equipment model as data parameters) and this is shown with dotted lines around the single calculation. Example below.
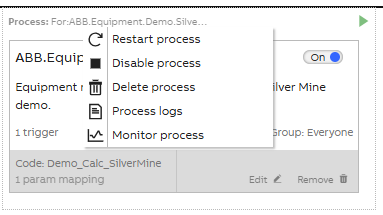
By right clicking on top of the process box, we can open the process menu as shown above. Here we have a selection of options to help us monitor and manage our calculation process. The changes we do here, affects all the single calculations within that process, so we urge caution.
Updated 12 days ago